Huntress CTF: 2025 - Reverse Engineering Challenge Writeups

I try my best to explain how I solve the 4 RE challenges from this years CTF, some of it relied on trial and error / recognising patterns and therefore may not be as technically accurate as i’d like
NimCrackMe1
SHA 256:
47d7fa30cfeeba6cc42e75e97382ab05002a6cd0ebb4d622156a6af84fda7d5e
Execution flow: Main > NimMain > NimMainInner > NimMainModule > main__crackme_u20
_buildEncodedFlag__crackme_u18_ gets called at
140012c02, followed by
_xorStrings__crackme_u3_at 140012c6b
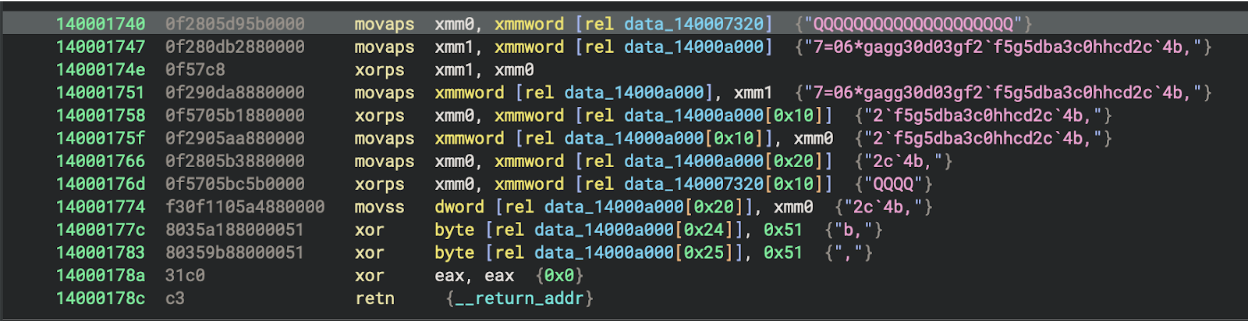
Dynamic Approach: Set a breakpoint at
140012c6b, step over the function call, review the data in
the R11 register

![]()

Static Approach: The
_buildEncodedFlag__crackme_u18_ function builds a Nim
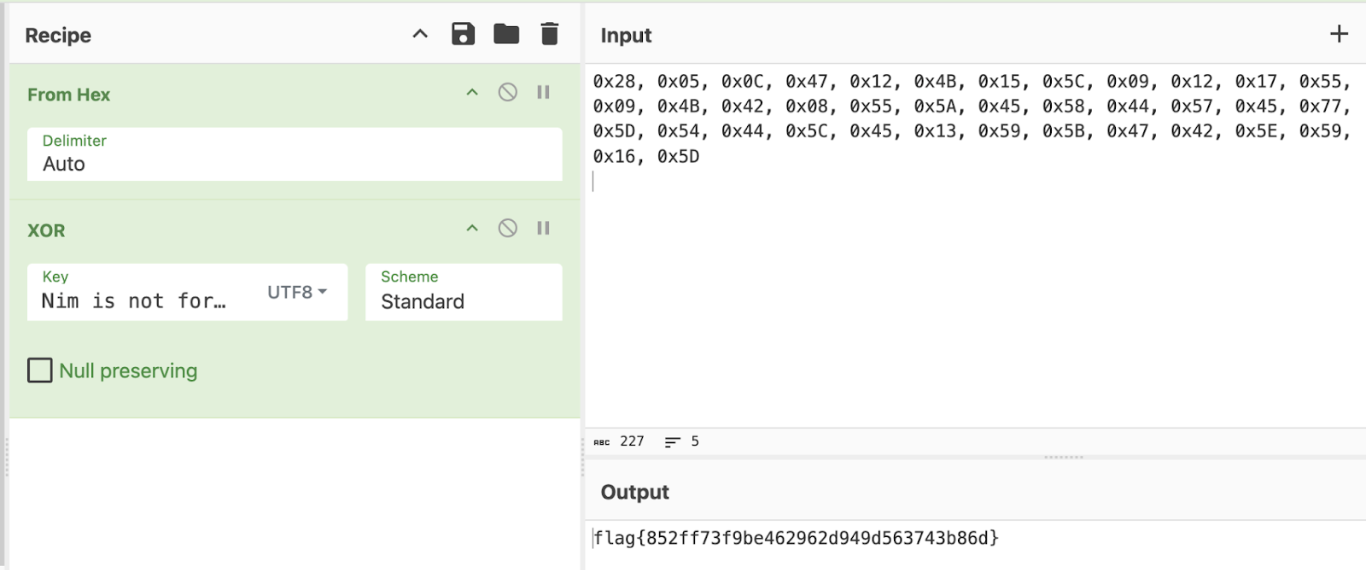
String of 0x26 (38) bytes in length.

The, one byte is written at a time, resulting in the hexadecimal
code:
0x28, 0x05, 0x0C, 0x47, 0x12, 0x4B, 0x15, 0x5C, 0x09, 0x12, 0x17, 0x55, 0x09, 0x4B, 0x42, 0x08, 0x55, 0x5A, 0x45, 0x58, 0x44, 0x57, 0x45, 0x77, 0x5D, 0x54, 0x44, 0x5C, 0x45, 0x13, 0x59, 0x5B, 0x47, 0x42, 0x5E, 0x59, 0x16, 0x5D
This result is stored in var_28
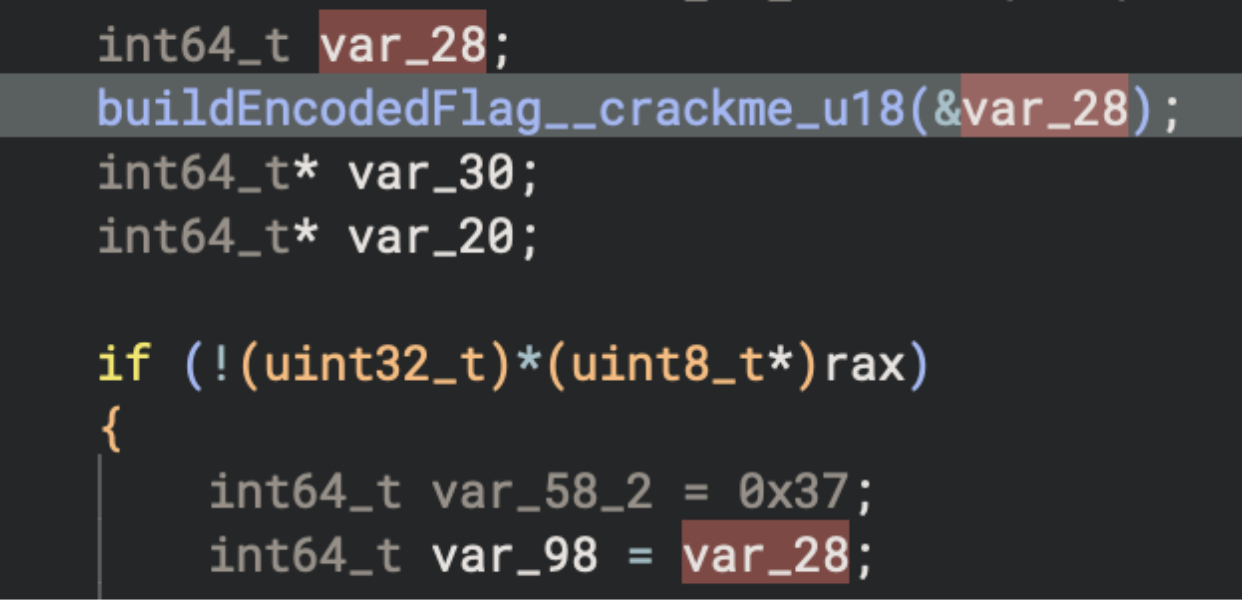
And soon, var_98, which is passed to
_xorStrings__crackme_u3_ as the 2nd argument.
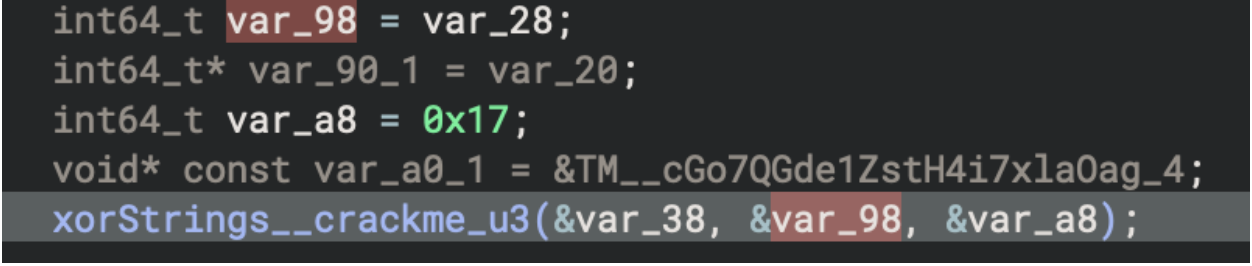
The first argument is the result, the second is the encoded flag, and
the third is the XOR key (length (var_a8) and key
(var0_1))
var_a0_1 = &TM__cGo7QGde1ZstH4i7xlaOag_4
TM__cGo7QGde1ZstH4i7xlaOag_4 is a global variable for
Nim is not for malware!
Rust Tickler
SHA 256:
df95140548732f34d8cf11b6b9dd7addb31480fab871b7004c7c1e09acfd920b
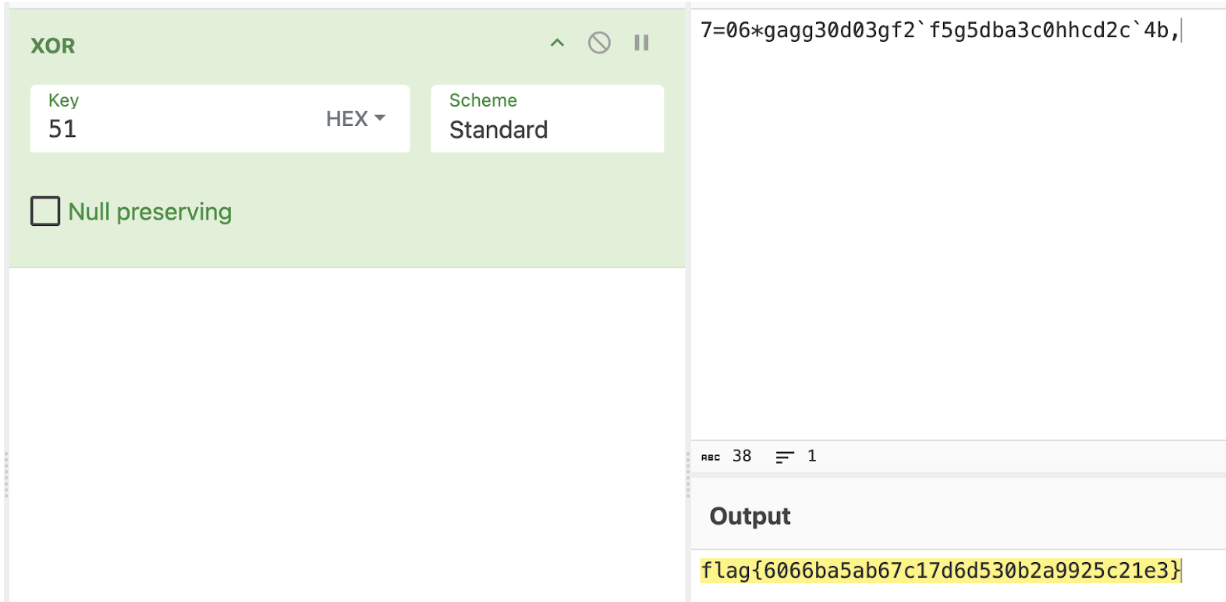
Finding main: Entry point > FUN_140005424 > FUN_140001790 > FUN_1400011f0
Towards the end of this large function is an undefined function
sub_140001740.

![]()
We can see a string being XOR’d with 0x51
Replicating this will result in the flag

Rust Tickler 2
SHA 256:
47d7fa30cfeeba6cc42e75e97382ab05002a6cd0ebb4d622156a6af84fda7d5e
Main > 0x140001350

Set a breakpoint for this address in x64dbg:
A few instructions into this function, data gets moved to RDX, and the length of data is moved into RAX

Jump over this instruction in a debugger and right click the RDX register > Follow in dump to see the data

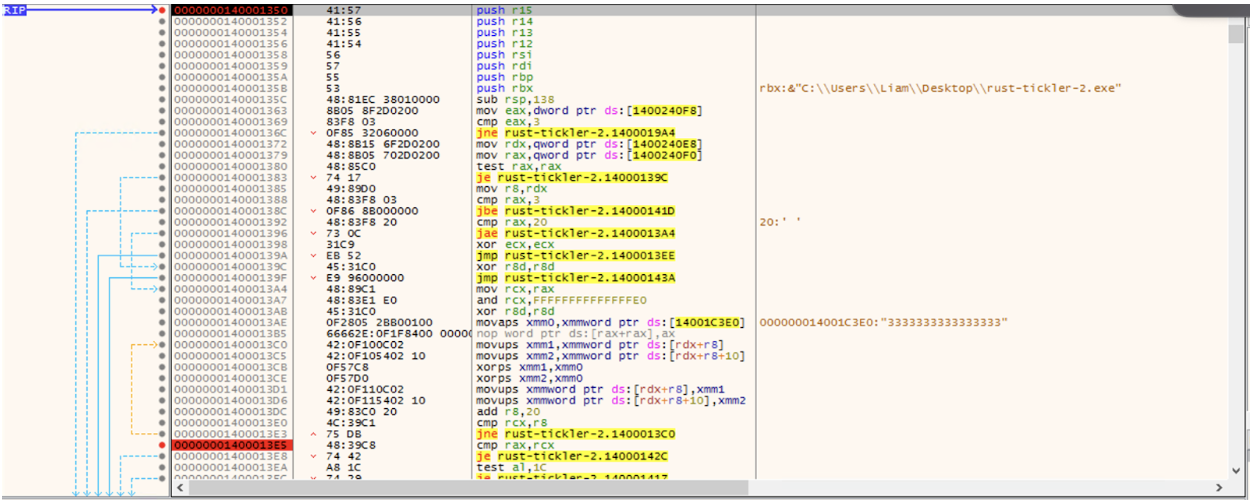
At 1400013ae, an XOR key is moved into
XMM0
![]()
An XOR operation then occurs using this key towards i_3
(The data in RDX)

This XOR operation is performed in the following loop:

Partial decrypted data in RDX after the first iteration shows a HNTS header:
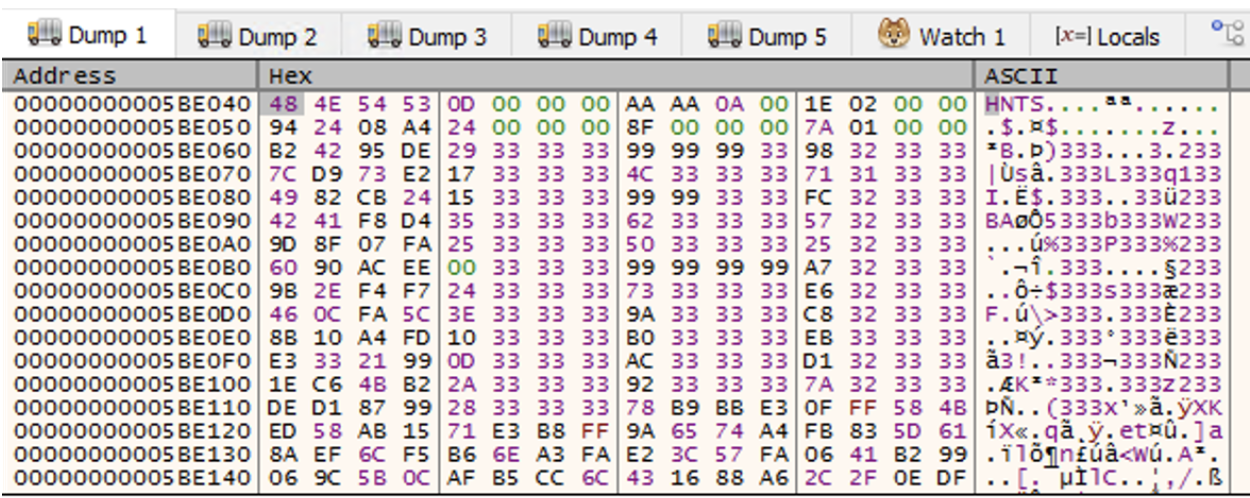
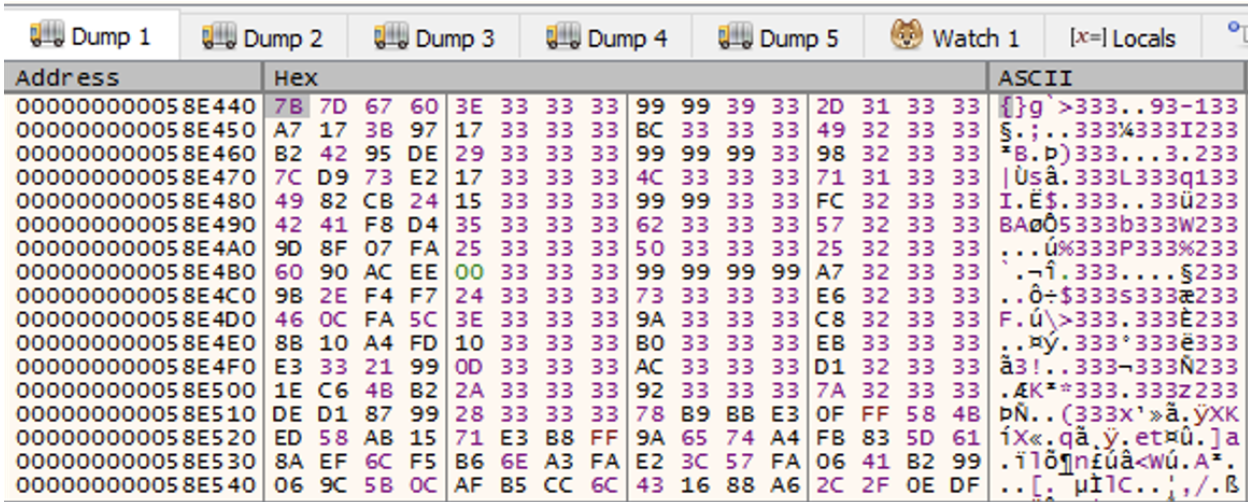
Set a breakpoint at 1400013E5 and hit it to complete the
decryption loop, revealing the decrypted data structure in RDX
This decrypted data structure gets passed to function
140003ea0
![]()
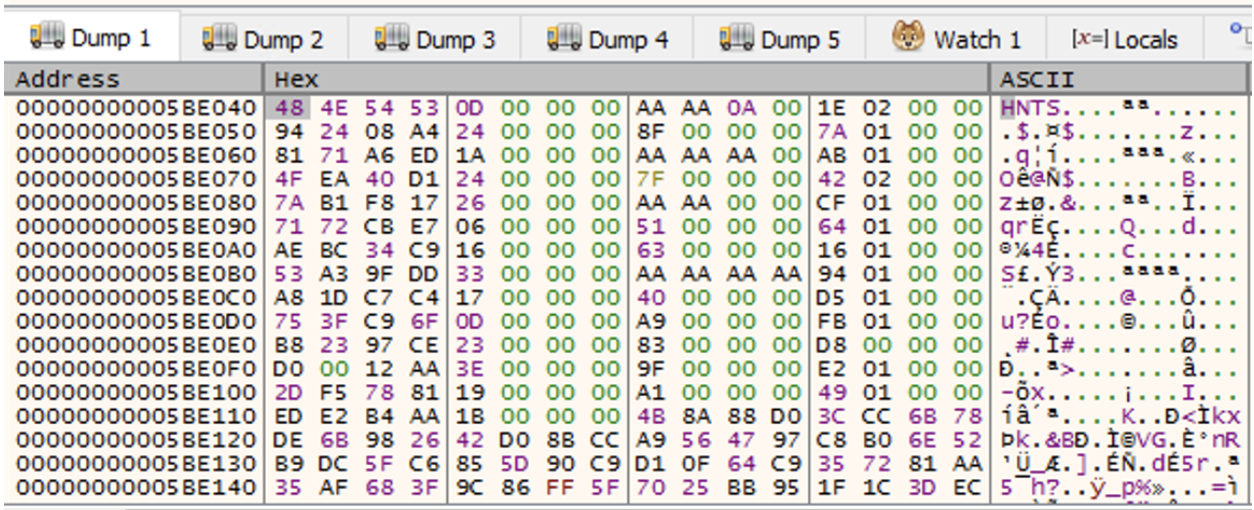
This function is essentially the HNTS data parser, it checks that the data is as expected by checking the magic bytes and creates an indexed array for later lookup
The parsed data structure is moved into the RDX prior to the call to
function 140003de0
![]()
0xAAAAAAAA is then moved into the R8 register
![]()
These values are used as arguments for the call to function
140003de0
![]()
After passing this function in a debugger, a string is returned:
![]()
A similar set up occurs later, where 0xAAAA is moved
into R8 and returns another string after a call to
140003de0

Which returns the string Bingus
![]()
So the values being moved to R8 prior to the function
call return different strings. They are acting as IDs within the HNTS
data structure and return different output depending on the ID
provided.
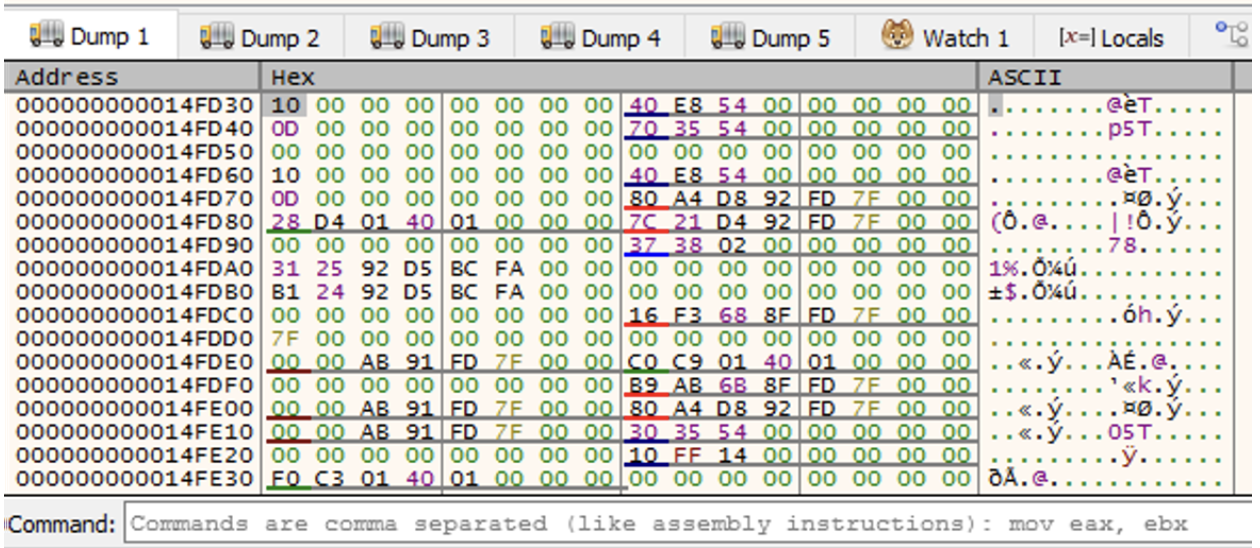
Looking at the HNTS data structure, the IDs are formatted in a pretty recognisable way:

We already know that AAAAAAAA and AAAA are
valid IDs, AAAAA is also later called in the code. The rest
of the IDs highlighted in this zone are also valid due to their offsets
within the structure.
Modifying the R8 register to one of these IDs prior to
the function call changes the result
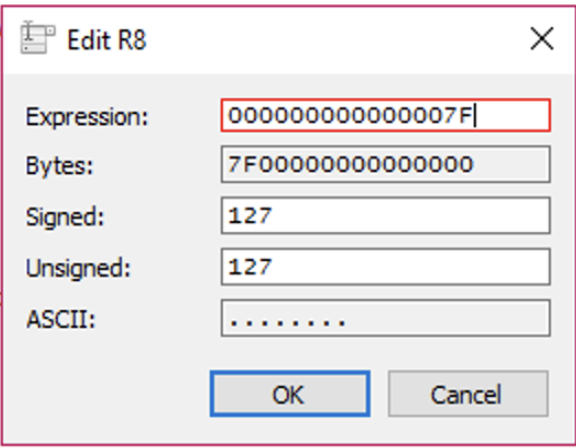
The 7F structure ID will return the flag:
![]()
Rust Tickler 3
SHA 256:
a4a5b64d72540552c691293f9e988e189674275f6e4743b8d61f299bd6f31fc7
Main function of interest: 1400011f0
This challenge initially follows a similar format to Rust Tickler 2
where an ID is moved into R8 prior to a function call which
results in a different string being returned, for example:

This results in:
![]()
When we get to 1400013C2, there is a conditional jump,
where either ID 1338 or 1339 is used
![]()
![]()
Trial and error tells us that 1338 is the failure, and
1339 is the success, so we’ll set our RIP / patch the ZF /
binary to follow that execution path.
Failure / success is determined based on if the provided input is
equal to the result of ID 133A
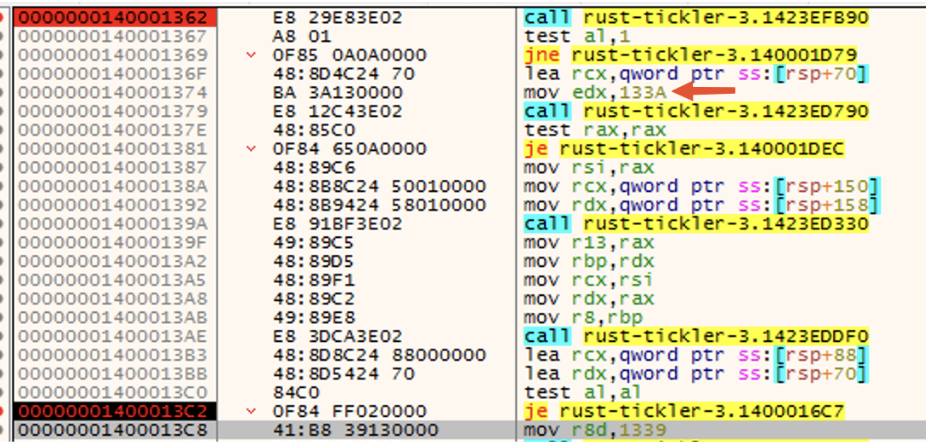
Modifying one of the IDs in R8 prior to the
1423ED7D0 function call will reveal the answer:

Continuing to follow execution, we see a path being built:
(ID 1348 = Exodus)
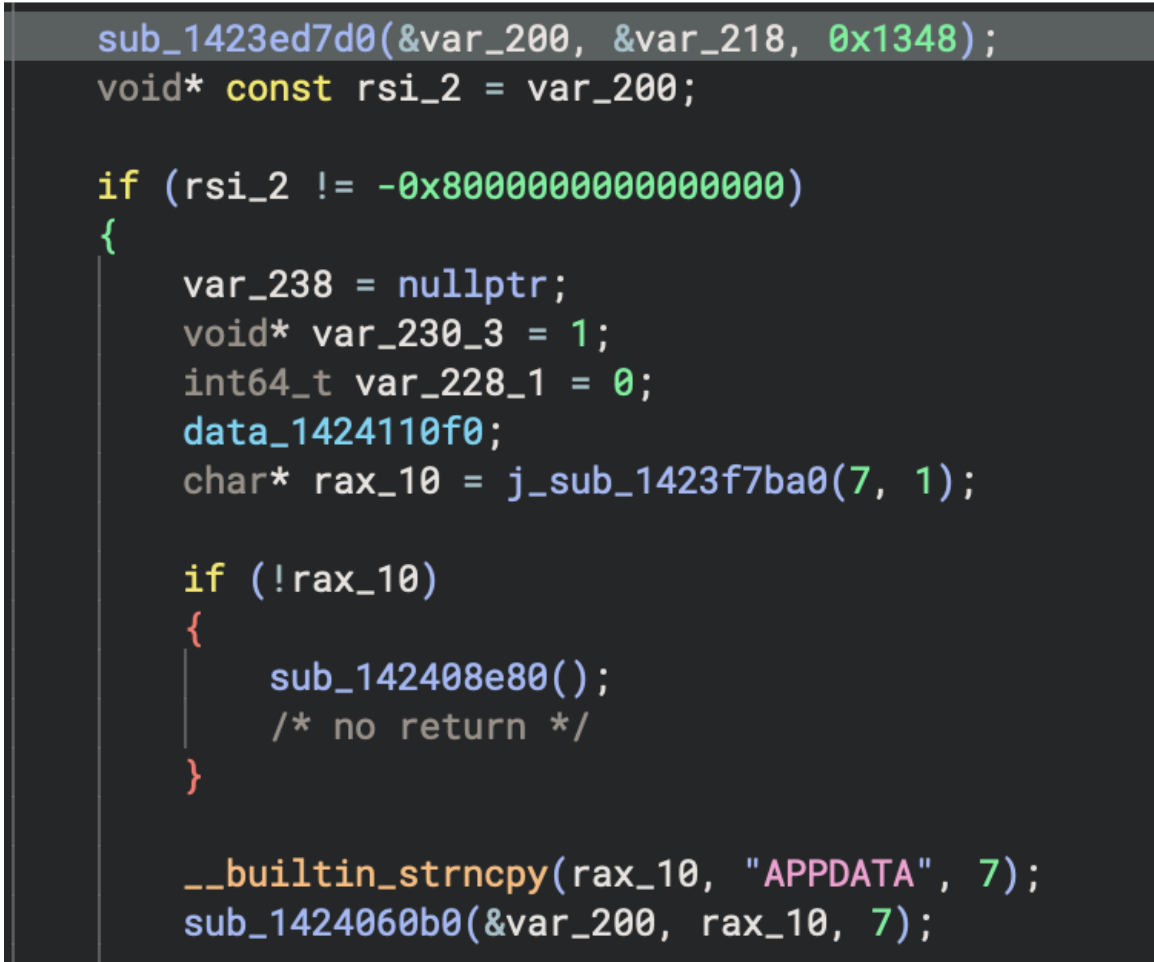
![]()
The binary will terminate shortly after this is seen if this directory doesn’t exist.
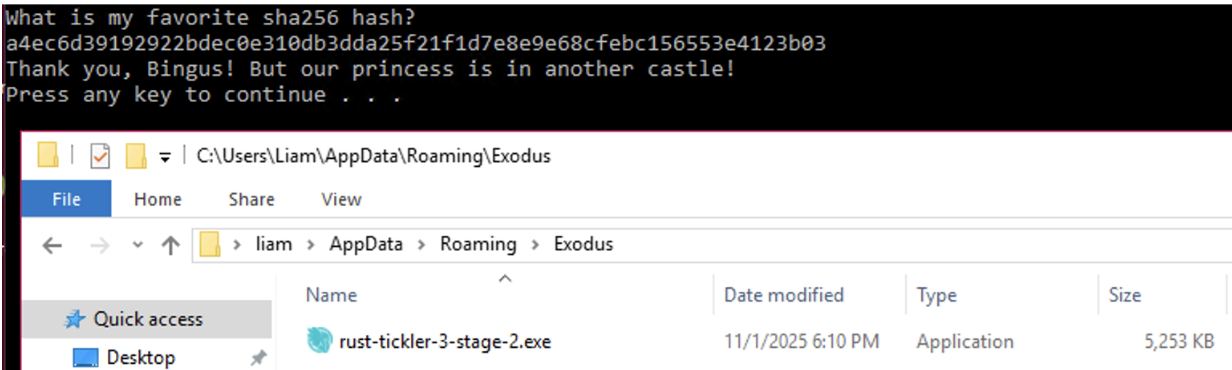
If the correct answer is provided and the above path exists, a file
(filename created from ID 1369)
So all we need to do is create this directory and supply the hash when prompted by the executable.
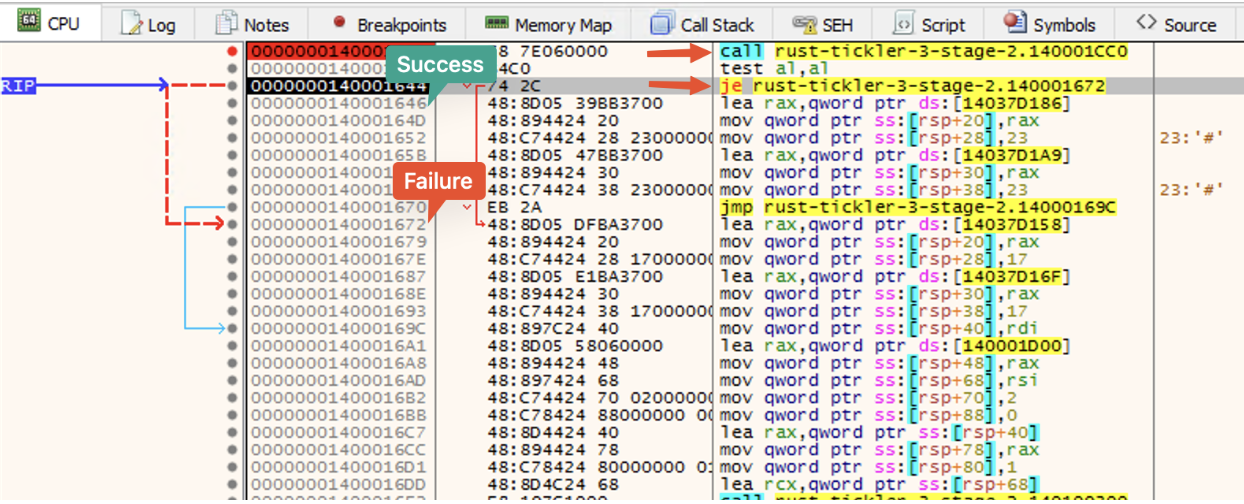
Stage 2 performs a memcmp to compare supplied input to a known value and if that value matches, the success path is executed.
However, patching the binary to get a success just reveals the message:

And there is not much change in execution flow as seen:
The answer lies between 140001354 and
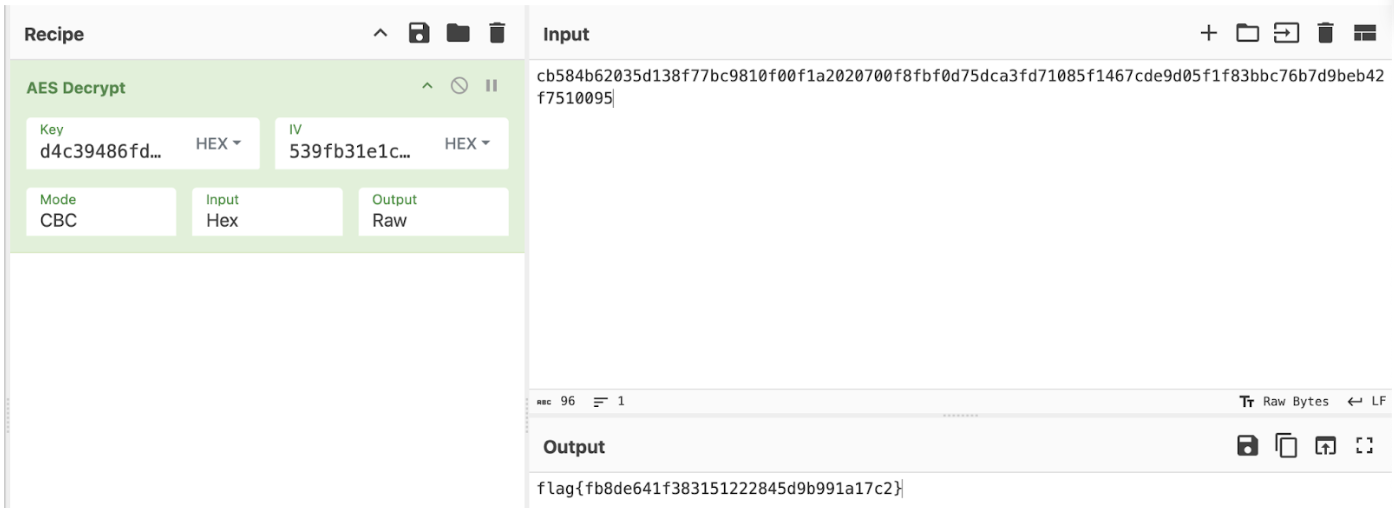
1400013c3. This is AES ciphertext, AES key, and AES IV.
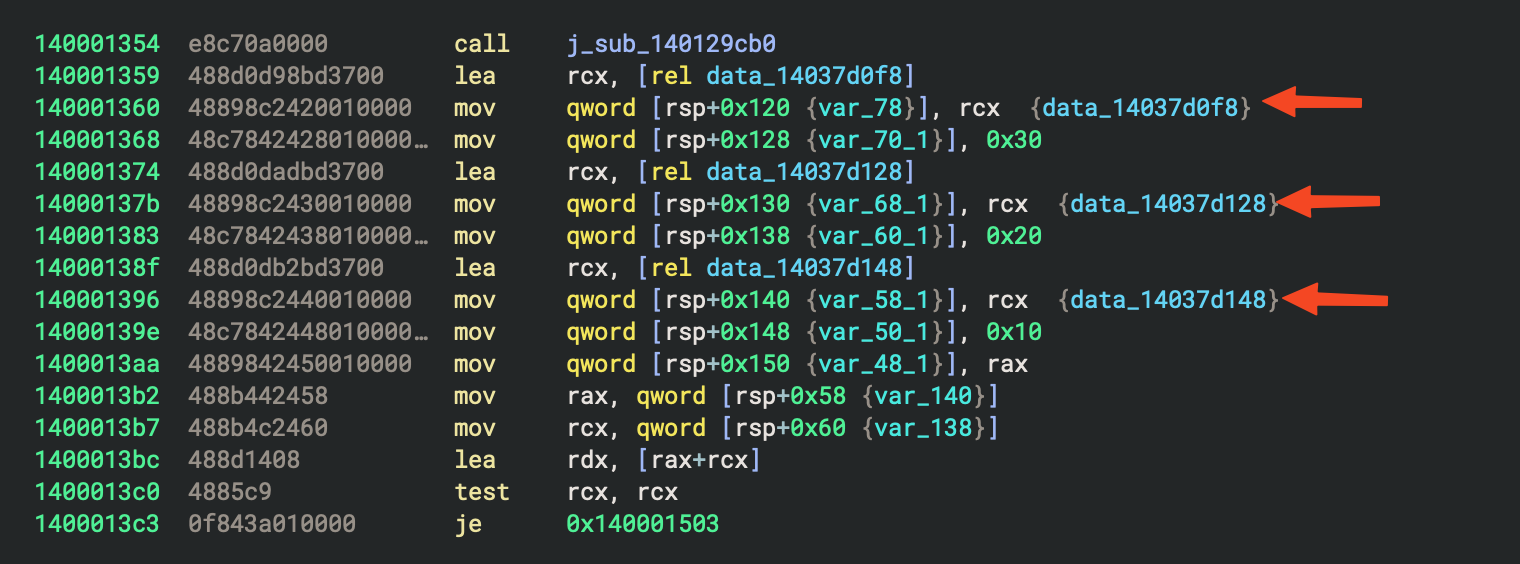
I believe this data is then passed through further cryptographic functions prior to being used by the memcmp function.
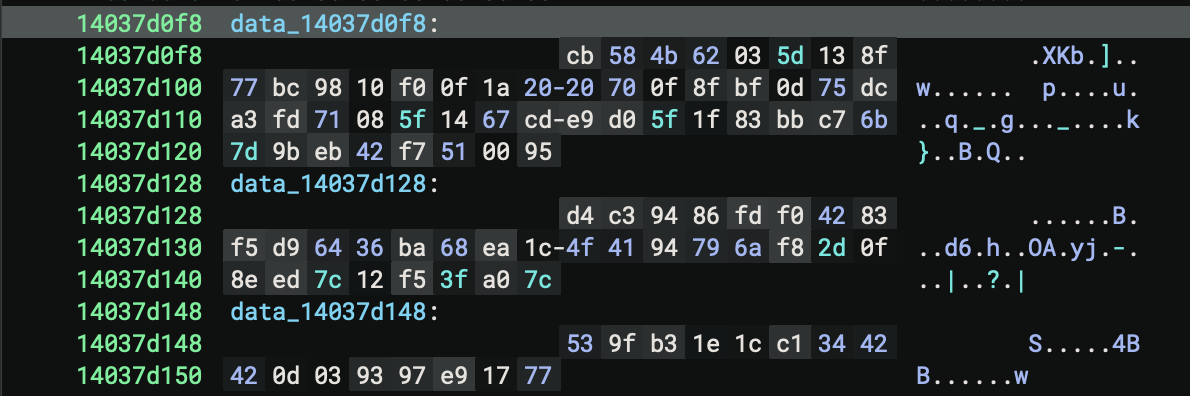
Data_14037d0f8 =
cb584b62035d138f77bc9810f00f1a2020700f8fbf0d75dca3fd71085f1467cde9d05f1f83bbc76b7d9beb42f7510095
Data_14037d128 =
d4c39486fdf04283f5d96436ba68ea1c4f4194796af82d0f8eed7c12f53fa07c
Data_14037d148 = 539fb31e1cc13442420d039397e91777
These data variables follow that of AES 256, where the cipher is 48 bytes, followed by a 32 byte key and 16 byte IV.